Before you begin carving your walking stick, it is essential to learn which woods work best. Also, you will want to be familiar with the different techniques of whittling. David Allen used these techniques to carve his walking sticks. Also, be sure to read some famous quotes about walking sticks and how to carve them. Here are some tips for carving the perfect walkingstick. So, read on to learn more! Now you can carve a walking stick that will be a unique, functional piece of art!
Woods that can be used for carving a walkingstick
Finding a straight blank to carve is the most challenging part of the process. There may be a few branches that are too bent to be of use, but it is worth searching until you find one. A straight branch can be harvested during winter when the sap is moving from the roots to the branches. This will make the wood more stable, and less likely to split. However, if you can't wait until the spring to harvest the wood, it's fine to cut it while the tree is still green.
For carving a walkingstick, you can choose from several species of wood. The North American hardwood Chestnut is strong. Its density makes it ideal to make walking sticks, and other similar tools. This species has a wood grain that is open or slightly closed. It creates a strong walking stick with a smooth, solid feel. It is also very beautiful and is frequently used in carving. You can carve some species with the bark still in place.
Techniques to whittle a walking sticks
There are some basic steps to carving a walking stick. First, choose a piece with a unique texture. Some woods have distinct bark patterns and colors while other woods have natural twists. You can enhance these features with lacquer or paint. To make the shaft more appealing, you might also carve it. Make sure that the stick you choose is straight, free of branch shoots or hard spikes.
This book will teach you about different wood types and carving styles. Most common are snakes and Lions. There are many realistic designs you can create, including snakes and fish. Many people consider these artists to be God-given. This book is suitable for advanced and novice carvers.
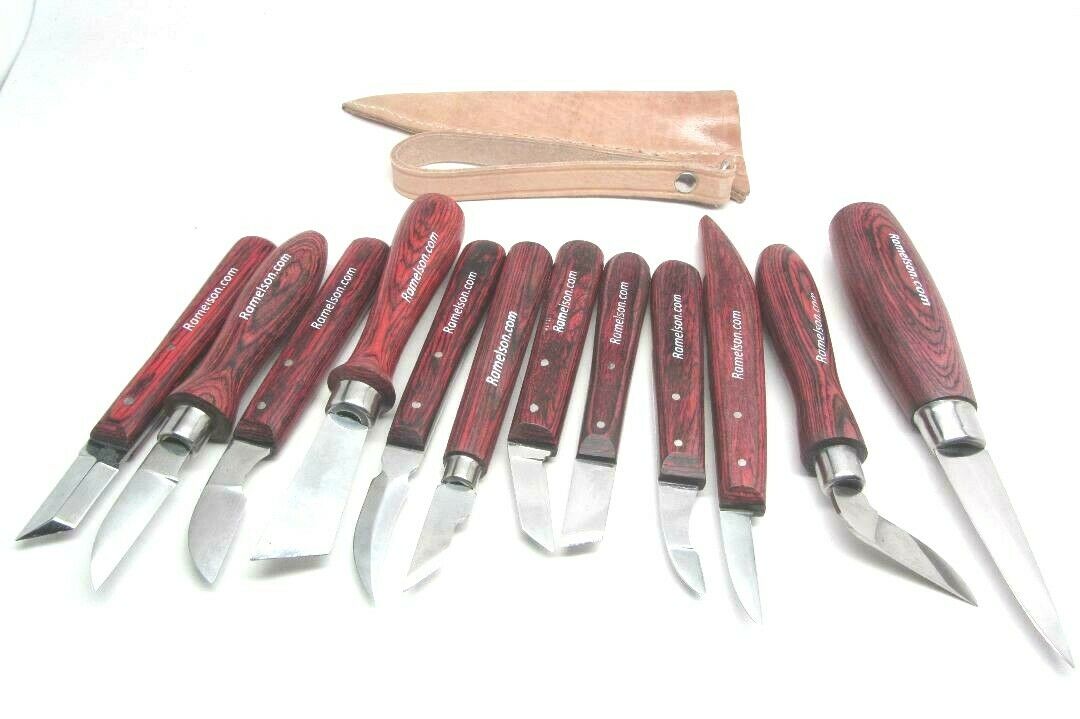
David Allen uses the following tools for carving a walkingstick
David Allen was just a small boy when he started to make toys with the pocketknife he had found under his house. Because he was too young for a knife to be used, he had the knife hidden from his family. His creations were toys like slingshots as well as utilitarian objects, such shoeshine containers and other toys. Allen began to carve walking sticks at the age of 15 after becoming disabled. Allen worked with a pocketknife, a chisel and a chisel to carve the wood.
Allen developed his designs independently, digging around the roots of saplings and deciding on what to carve. He believed that the design should be "seeable" before it could ever be carved. This was the same process as many other African-American artists. Allen often had visions of the design that he wanted to carve. This allowed him to create a stick that would resonate with the emotions and feelings of his community.
Famous quotes about walking sticks
Carving a walking stick requires complex skills and a solid blank. This is the most challenging part of the whole project. Although there are many sources of your stick, it is important to persevere in finding one that is straight. It may appear bent beyond practical use, but keep searching until you find one. It is best to cut your stick during winter sap flow from the tree's branches down to the root. The sap makes the wood softer and less likely split.
Consider the wood's texture and color when choosing wood. Each piece of wood has its own unique texture and color, and may have unique swirls or bark marks. You can enhance the natural swirls by applying lacquer. You want a smooth finish so make sure to remove any branches shoots or spikes from the shaft. This will make the entire process easier. No matter what material you choose to use, it is important that you consider the type and finish you will use.
FAQ
Can I refinish furniture that I make?
Yes! Yes! There are many methods to refinish antique furniture without hiring a professional. Here are a few ideas:
To remove stains and scratches, use sandpaper. Finally, use a clean cloth or sponge to clean the surface.
Apply clear polyurethane varnish. Before moving furniture, let dry completely.
Use acrylic paint to paint furniture.
You can stain the furniture instead of using paint. Furniture will look richer with the stain.
Shellac wax can be applied. You can protect your wood with wax and give it shine.
Where can I buy hardwood lumber?
Home Depot has hardwood lumber for sale. You will find a range of wood products available at Home Depot.
A wide range of engineered hardwoods are also available, such as Ipe and Brazilian Cherry (Pau d'Arco), Mahogany and Swietenia Macrophylla.
You can find these woods for sale online by searching "hardwood lumber" on Google.
What amount of money do I need to get started with my business?
Since every project differs, it is impossible to give exact numbers. Consider these factors if you need to estimate the amount of money that you will require.
-
Material costs
-
Tools and equipment
-
Time spent on the Project
-
Your hourly rate
-
How much profit do you expect to earn
-
No matter if you are looking to hire someone
It's a good idea for beginners to start with small projects like frames and boxes. You'll become more proficient as you get experience.
What is the hourly rate for a woodworker?
The hourly rate for a professional Woodworker will vary depending on many variables, such as experience, skill level and availability.
The hourly average rate for skilled woodworkers runs between $20-$50.
A less experienced woodworker may charge as little as $10 an hour.
What are the basics of woodworking?
It is an excellent way to learn how to build furniture. You can make a simple bench yourself. This project can easily be done using whatever wood you have at your house. If you don't know what kind of wood to use, then go ahead and buy some cheap pine boards from Home Depot or Lowes. Once you have built your bench, you will need to sand it off and then finish it with a stain/varnish.
Are there any tips for starting a woodworking enterprise?
It is hard work to start a woodworking company. If you are passionate about your hobby, it will not be difficult to put in the work. You might even enjoy running your own business.
One thing to keep in mind when launching a new venture is that you might encounter unexpected problems along the way. Unexpectedly, money might run out. Maybe customers won't be willing to pay what you want. You must be ready to deal with such situations in order to survive.
Set up a separate account in your bank for your business. This will ensure that you always know how much money has come in.
How often should I get new supplies?
You'll probably have to replace some of your tools over time. Hand tools will need to be sharpened regularly. If you are using power tools, you will need to purchase replacement parts regularly. Avoid buying too many products at once. Spread your purchases out over several months.
Statistics
- If your lumber isn't as dry as you would like when you purchase it (over 22% in Glen Huey's opinion…probably over 10-15% in my opinion), then it's a good idea to let it acclimate to your workshop for a couple of weeks. (woodandshop.com)
- Most woodworkers agree that lumber moisture needs to be under 10% for building furniture. (woodandshop.com)
- The best-paid 10 percent make $76,000, while the lowest-paid 10 percent make $34,000. (zippia.com)
- The U.S. Bureau of Labor Statistics (BLS) estimates that the number of jobs for woodworkers will decline by 4% between 2019 and 2029. (indeed.com)
External Links
How To
How do you measure wood accurately?
There are many methods for measuring wood. A digital caliper is a tool that measures distances. We also use a laser level to ensure your work surface flattens.
A digital caliper can have two jaws, which open and close. The first jaw holds the object, and the second measures the distance between them. Digital calipers are great for measuring small distances, such as thicknesses of wood.
Laser levels use an infrared beam of light to project a line across the ground. The laser emits red dots on the line. If you look down on the line, it will show whether the surface appears even or not. Laser levels are ideal for checking the accuracy on large surfaces.
Bubble levels look similar to a compass. The device has a bubble at its center. As long as the bubble is centered, the device will tell you whether the surface is level or not. Bubble levels are great for checking the accuracy and precision of smaller areas.