A novice might wonder how to add texture to woodturning projects. Here's an easy way to do it: watch Ernie Conover demonstrate the process. Textures are natural patterns which can be used as ornaments on objects. They can add personality and style to your turning projects. There are many ways to add texture and color to your project.
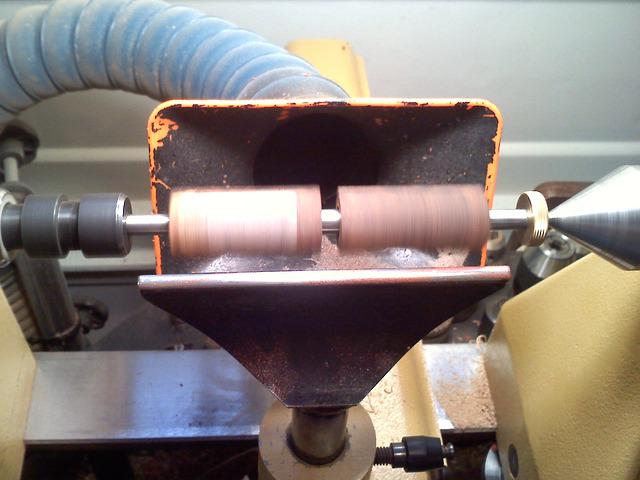
Making a rolling pin
You might be curious about how to make a rolling Pin if you have recently started woodturning. Wood rolling pins are generally long and made of wood that is free of defects throughout. You can use any kind or length of hardwood to make a rolling pin. The best woods for this purpose are hard maple, cherry, apple, ash and similar woods. While some cheaper versions can be made from soft maple or birch, it is important to choose the right wood for your task.
To begin, measure the diameter of the handle and the diameter of the rolling pin. Measure the diameter using the Parting tool. Then use the Roughing Gouge and reduce the handle to its diameter. The Bowl Gouge can be used to create the curves for the rolling pin after you have measured the diameter. This will allow you to start threading the pin. Once the rolling pin is ready, apply a food-safe finish and let it dry for 15 minutes.
Making a salt and pepper shaker
There are many ways you can make these handy utensils. You can make a stunning salt-and pepper shaker by using a mason jar. Lightly punch holes through the letters using a small nail and your hammer. Leave 5/8-inch of wood on the ends and place a cork in the holes. Fill the shaker with salt and pepper and enjoy your creation.
If you have Coca-Cola bottle collections lying around, these bottles could be used to make salt-and-pepper shakers. To add some detail, you can use tape to remove the lines from the bottle. You can use any color of all-surface spray paint.
Making a bottle stopper
You need to follow a few steps in order to make a bottle stopper. You must first mount the blank on two sides. This creates a collet that can be mounted in the chuck. Then, you will turn a piece to produce the desired shape. Then, you'll turn a threaded piece to attach the decorative turned portion to the bottle. Different sizes of threaded boards can be used.
It is crucial to select the right type of wood before you begin the process. You can find blanks in a craft center. Although the blanks are already squared, if the blanks are cut by you, make sure they are perfectly square. If you buy the wood from a store, you may have to square them up. Instead, you can use a tablesaw and chop saw. You can clamp an odd-shaped piece to make it square. To finish the job, use a fine-grit to sandpaper.
Making a stacked ring bowl
A stacked ring bowl is a bowl that you create for woodworking by cutting multiple flat boards into concentric rings. The rings are normally glued together using butt joints, but sliding dovetail joints can be added interest. The boards should measure five inches wide by one inch thick. The boards have been joined together and the edges of each board have also been planed.

You can cut a segmented ring bowl using a jig or trammel. The thickness of your board will determine the spacing between the segments and how many layers you need to achieve the desired height. The thickness of the board should not be less than 1 inch. You can also use a circle-drawing jig or trammel to mark the band saw lines.
FAQ
Is it possible to learn woodworking by yourself?
Doing is the best way to learn any subject. Woodworking is an intricate art form that requires practice, skill, patience, and experience. To master any craft, it takes time.
Learning how to do something is best done by doing it. Start small and use what you learn.
How often should I get new supplies?
You will likely need to replace some tools over time. If you're using hand tools, you'll need to sharpen them regularly. You'll also need to replace parts if you use power tools. Spread your purchases over several months to avoid purchasing too many items at once.
Which woods are good to use for furniture-making?
Woods are classified by their hardness. Softwoods include cedar, pine, cedar, and Cypress. Because they are resistant, they can be used for outdoor furniture. The hardwoods are oak, maple and mahogany. They're generally used indoors because they won't weather well outdoors.
Statistics
- In 2014, there were just over 237,000 jobs for all woodworkers, with other wood product manufacturing employing 23 percent; wood kitchen cabinets and countertop manufacturing employing 21 percent. (theartcareerproject.com)
- If your lumber isn't as dry as you would like when you purchase it (over 22% in Glen Huey's opinion…probably over 10-15% in my opinion), then it's a good idea to let it acclimate to your workshop for a couple of weeks. (woodandshop.com)
- Woodworkers on the lower end of that spectrum, the bottom 10% to be exact, make roughly $24,000 a year, while the top 10% makes $108,000. (zippia.com)
- The U.S. Bureau of Labor Statistics (BLS) estimates that the number of jobs for woodworkers will decline by 4% between 2019 and 2029. (indeed.com)
External Links
How To
How to join wooden boards without using nails
Woodworking is a popular hobby. It's fun and relaxing because you can use your hands to make something useful from wood. Sometimes you may want to join two pieces together of wood without using nails. This article will explain how to do this so that your woodwork projects stay beautiful.
Before joining the pieces of wood together, you will need to first trim any edges. Avoid leaving sharp edges that could lead to problems later. Once you have done that, you can begin gluing your boards together.
If you are working on hardwood, you should only use glue on one side. For softwoods like cedar and pine, glue should be applied to both sides. Apply the glue to the boards and press them down until they are securely attached. After applying the glue, let dry the boards before proceeding to the next stage.
After you have glued your boards, drill holes where you want to insert screws. You can choose the type of screw to determine the size of your holes. For example, if you intend to use 1/2-inch wood screws, you need to drill a hole that is at most 3/4 inches deep.
Once you have drilled your holes you will need to drive the screws through each joint and into the backside. Avoid hitting the board's top surface. Otherwise, you could ruin the finish. Avoid hitting the screws' ends too often when driving screws. This will prevent splitting in the end grain of the wood.
Once your project is complete, it's time to protect it against the elements. You can either seal the entire piece of furniture or cover the top. It doesn't matter what method you use, you want something that will last many years. There are many options: oil-based varnishes; polyurethane; shellac; lacquer.
You can find these products at most home improvement stores. It is important to ensure that you purchase the correct product for the job. Some finishes are toxic and should not ever be used indoors. Always wear protective gear when handling any of these finishes.