
This guide will help you make intarsia art from wood. This guide covers wood types, patterns, tools, and techniques. This exciting craft is described in detail below. Depending on how skilled you are, you might be interested in working with a different variety of wood. For those who are just starting out in this craft, it is a good idea to make a sample.
Patterns
You can create a variety of intarsia projects if you are a skilled woodworker such as holiday, tree, and flower ornaments. The intarsia wooden patterns included in this book can be used by all levels of woodworkers and show the artistry that the process requires. 21 full-size Intarsia Patterns are included. There is also helpful information regarding shaping, wood and blades.
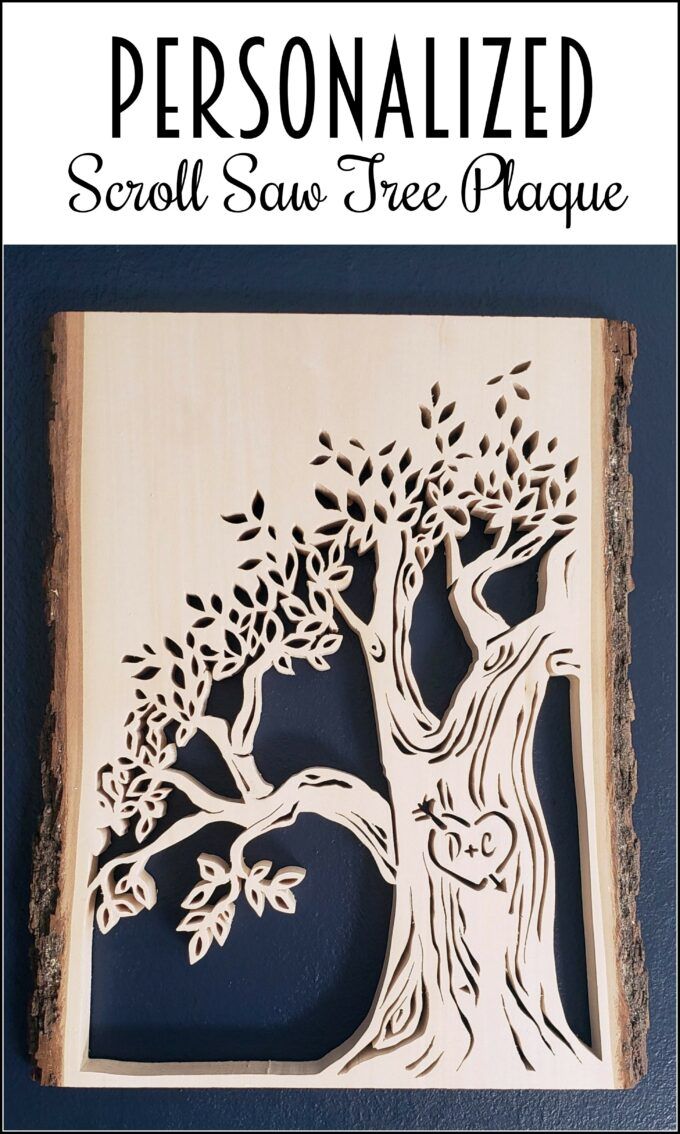
Intarsia allows you to create an original piece of furniture, or wall hangings by using different wood species. It's like building a puzzle, with different pieces of wood arranged next to each other. The wood is then stained or polished and each piece is then assembled to give the project depth and character. Making intarsia-wood patterns can be quite difficult. It is worth looking for free intarsia patterns to help you make the right choices for your project.
Tools
You need to have special tools for intarsia. A small belt grinder is a good tool to quickly remove materials and smoothen the edges. A dremel, or flex shaft, can be useful if you are looking for a tool to shape and sand fine details. You will find different tools and blades for shaping small areas.
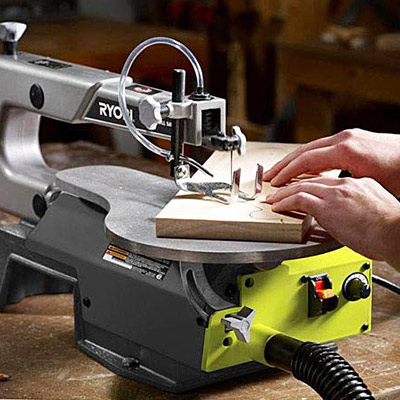
Jigsaw: Jigsaws are great for cutting wood, but cannot make the intricate cuts that a scrollsaw is able to achieve. Sanders are required to smoothen wood surfaces. Two different wood types are needed for intarsia work. The wood can then be stained in a variety of ways. Once the wood is cut it will then be sanded to create mosaic-like designs.
Techniques
Amazing intarsia creations are not difficult if you follow the right steps. A pattern is an excellent starting point for your artistic creativity. You'll be well on the way to creating stunning pieces of intarsia wooden art with these ideas. These are some examples of techniques:
First, select the project design. Make extra copies of your pattern. Next, you need to choose the species wood you intend to use. Different species of wood have different characteristics. Roughing out the thickness of each piece of wood gives your project a more interesting depth and dimension. You can also add pieces by glueing on additional layers of wooden. End your project by removing any backing and leaving the fully finished Intarsia piece.
Woods for use
No matter whether you are just starting out with inlaid wooden work or have been doing it for years, this book will teach you how to create beautiful pieces that stand apart. Kathy's progressive approach will teach you everything from the basics of color break and the nuances thereof. You'll be referring to this book even if you have never made intarsia before.
First, select woods that will complement each other and have the same grain orientation. For example, a Teddy will require 20 pieces of wood from four different wood types with different grain orientations. This means that you will need a high-speed saw. Once you have determined the wood's grain orientation and color, you can start cutting and staining.
Colors
The colors of intarsia wood are as varied as the pieces themselves. While saps are clear, heartwoods may be gray or reddish brown. Cherry is one example of a wood that darkens with age. Cherry's initial tone is light, but it becomes medium-colored when exposed in the sun. Cedar and other woods have different tones. This gives your project depth.
Intarsia can be described as a form of art that involves gluing different pieces of wood together to make patterns. It was first created in the Islamic region, but it is commonly associated with Italy today. To create a three-dimensional effect in woodwork, they use different shades and thicknesses of wood. Intarsia is often used on jewelry boxes as well as wooden chests and keepake boxes.
Time-consuming process
The intarsia technique is complex and requires the use different types of wood as well as staining techniques. Artists must have a variety of wood types and stain colors in order to create beautiful intarsia designs. While plywood and birch are the most common woods to use, there are many other options. Artists have the freedom to choose which wood they like. Intarsia projects can be created by many craftsmen using Western Red Cedar.
Intarsia woodworking begins with the cutting and labeling of inlay pieces. The artist then glues or adheres the pieces. After the glue has dried, the woodworker finishes each piece by adding a double bevel inlay. This is a time-consuming task that requires great skill. The finished product is truly a work in art.
FAQ
How do I organize my shop?
To keep your workshop tidy and organized, you should first create a place for tools storage. Keep your tools away from dust and debris, so they stay sharp and ready to work. You can hang tools and accessories with pegboard hooks.
Where can I buy woodworking supplies?
There are plenty of places where you can find everything you need to start out. For example, you could visit local hardware stores or look online at websites like Amazon.com.
You can also look for used furniture at flea markets or garage sales.
How can I learn basic woodworking skills
A great way to start learning how to build furniture is by building a simple bench for yourself. This project can be completed with whatever wood you have available at home. If you aren't sure what type of wood to use, you can buy cheap pine boards from Lowes or Home Depot. After you've built your bench, you'll want to sand off all the rough edges and finish it with a stain or varnish.
What type of tools does a carpenter use?
Carpenters most often use a tool called a hammer. A hammer is used for pounding nails into wood. This helps to keep pieces together when they are working on a project. Other tools include clamps. pliers. screwdrivers. measuring tape. pencils. saws. drills. wrenches.
How do I get started with woodworking?
Building furniture is the best way to learn how furniture is made. While you will need tools, mistakes are inevitable, but you will learn the ropes if you persevere.
First, choose a project you would like to complete. You could make something as simple or complex as a box. Or you could build a whole entertainment center. Once you have settled on a specific project, it is time to find a woodworker in your area who is experienced in such work. Ask them for their advice about the tools and where they can be found. Maybe you can ask the person if they know of anyone who does this sort of work.
Statistics
- Woodworkers on the lower end of that spectrum, the bottom 10% to be exact, make roughly $24,000 a year, while the top 10% makes $108,000. (zippia.com)
- If your lumber isn't as dry as you would like when you purchase it (over 22% in Glen Huey's opinion…probably over 10-15% in my opinion), then it's a good idea to let it acclimate to your workshop for a couple of weeks. (woodandshop.com)
- Overall employment of woodworkers is projected to grow 8 percent from 2020 to 2030, about as fast as the average for all occupations. (bls.gov)
- In 2014, there were just over 237,000 jobs for all woodworkers, with other wood product manufacturing employing 23 percent; wood kitchen cabinets and countertop manufacturing employing 21 percent. (theartcareerproject.com)
External Links
How To
How to make wood joint
This tutorial will teach you how to join two pieces wood together. The "pocket hole joint" is a method whereby we drill holes into the wood and glue them together. This method works great if your wood is straight and smooth. If your wood isn't straight or flat, you might want to try another method, such as dowel joinery. Here are the steps
-
Drill Pocket Hole Joints. You will need to measure and mark the exact location of your pocket hole joint. You will then drill 3/4" deep holes through each piece of wood with a jigsaw, handheld drilling machine, or hand-held drill.
-
Sand Smooth. The wood's edges can be sanded to prevent splitting.
-
Glue the two sides of the wood together. Apply glue to both sides of the wood. Let it sit for about 5 minutes before clamping the pieces together.
-
Clamp the Pieces Together. After the glue has dried completely, you can clamp the pieces together until they are flush.
-
Trim Joinery. Trim the excess wood around the joint after the glue has dried completely.
To be able to turn the pieces inside-out, leave enough room between them.