A band saw's ability to make tight curves is limited by its blade. A cheaper model will often include a lower-priced blade. Professionals often keep several different blades on hand, but DIYers tend to only have one or two. There are several factors to consider when selecting the best band saw blade for tight curves. The type and depth of the cut should determine the blade's width. For delicate work and straight cuts, narrow blades will work best.
Variable pitch
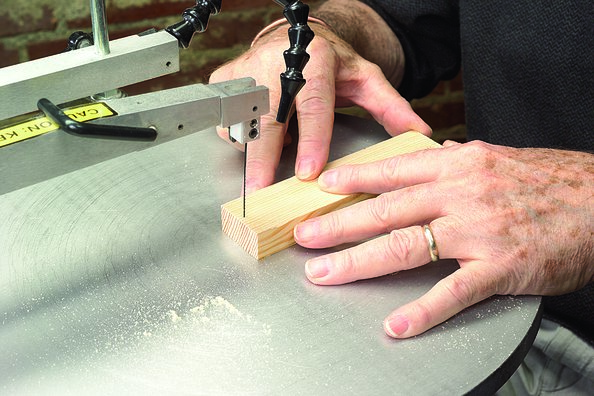
If you have to tackle a tight curve you might wonder if a Variable Pitch Band Saw blade is right for you. Find out how to choose and use the right blade for your task. This blade can easily cut through closed openings or tight curves. First, make some relief cuts around the curve to allow the blade enough room to turn. Remove the first piece of debris to clear the path.
The main advantage of this band saw blade is its high-quality teeth. The teeth of the band saw are subject to multiple forces as they cut through two walls of tube steel. As the saw advances forward, it releases the tooth by the downward feed force. Thicker chips, on the other hand, tend to stick to teeth and cause problems with the cut quality. The groove geometry promotes coolant flow to cut surface. This flushes out any chips that may have become stuck in teeth.
Regular-tooth
Use a wide blade to cut curves. The radius of the cut is determined by its width. Smaller width blades are used for tight curves, and large width blades are used for near-straight line cuts and resawing. You can use the chart below for guidance on the best blade width to suit your job. This chart provides guidelines to help you choose the right blade width.
When choosing a regular-tooth band saw blade for tight curve cutting, keep in mind that it will be subject to higher temperatures. This means that you'll need to apply more force to cut particular parts. Also, the blade will tend drift in one particular direction while cutting, increasing the possibility of smoke and burns. To prevent this, you can place a thin layer of beeswax on the blade.
0deg. Angle of the rake
The 0deg setting is the best for cutting straight curves. For best results, the rake angle on a bandsaw blade should be set. This angle is important for maintaining the cutting edge's straight edge and minimizing buildup. While the rake angle can't be measured directly, it can be estimated using a force gauge which acts in the same direction as the cutting edge. In addition, cutting-ratio values can be empirically determined, directly or indirectly.
For the ideal rake angle, you need to compare the radius of your cut and the size of your kerf. It's important to remember that different band saw blades can make different kerf sizes. Make sure to know the material you are using so that you can choose the right one. A scrap of wood can be used to check the rake angle on the bandsaw blade.
Wood Slicer
A band saw is a versatile tool that can cut tight curves and closed openings with ease. Make a few relief cuts on your workpiece to make it easier. These cutouts give the blade more room to turn. You should also make sure that you remove any waste from each cut. This will give it more room for turning. After you have completed the workpiece, turn off the blade.
For most curves and small interior cuts, a 1/4" blade is the best choice. The 1/4-inch blade will allow you to make tight inside cuts without causing the blade to drift. To get a precise cut, however, you will need to make intersecting cutting cuts before cutting. You should adjust the depth gauge of your saw to avoid binding, particularly on tight curves. A smaller radius blade can be used to cut the material.
Freshcut 37

The Freshcut 37 bandsaw blade will allow you to cut tight curves on your bandsaw. The blade has a relief cut which allows it to finish the curve and move on to the next steps. The blade wraps around the cut and leaves small pieces of waste for easy turning. Before you begin cutting curves, make sure that you always back out any cuts. This will stop the saw from twisting in the next cut.
If you plan to cut many tight curves on your bandsaw, you should consider purchasing a variable pitch band saw blade. This blade can cut through a greater variety of materials than a standard saw blade, including plastic, metal and wood. The variable pitch allows it to be used for a wider range of applications. It is also perfect for cutting metal, including plastic, metal, and composites. For added durability, this band saw blade is made of durable, heat-treated stainless steel.
FAQ
What time does it take for furniture to be finished?
It depends on what size piece of furniture you have. Smaller projects like boxes and picture frames can be finished within one day. Larger projects, like desks or dining tables require several days. It takes time for the wood to be stained and sealed properly.
How often should I get new supplies?
Over time, you may need to replace your tools. If you are using hand tools, you will need to sharpen them frequently. If you are using power tools, you will need to purchase replacement parts regularly. Spread your purchases over several months to avoid purchasing too many items at once.
Where to buy Hardwood Lumber
Home Depot offers hardwood lumber. You will find a range of wood products available at Home Depot.
There is also a wide selection of engineered hardwoods, including Ipe (Araucaria Angustifolia), Brazilian Cherry(Pau d'Arco), Mahogany (Swietenia Mcrophylla).
You can search Google for hardwood lumber to find them online.
How can a woodworker start making money?
Many people are looking to create their own furniture and start an internet business. If you are just starting to build furniture, there are many other ways to make money than selling on Etsy. Local craft fairs and events are great places to sell your products. A workshop could also be offered for people who are interested to learn how they can build their own furniture. If you have the experience to be a carpenter, builder, or a designer, you may consider offering your services in remodeling homes or creating custom pieces.
Is it necessary to be a genius in woodworking to succeed?
No. Woodworking does not require any special skills. You can create beautiful pieces of art by learning how to use simple power tools.
How can I keep my shop organised?
First, make sure you have a designated space for tools storage. Keep your tools away from dust and debris, so they stay sharp and ready to work. Hang tools and accessories using pegboard hooks.
Statistics
- Overall employment of woodworkers is projected to grow 8 percent from 2020 to 2030, about as fast as the average for all occupations. (bls.gov)
- In 2014, there were just over 237,000 jobs for all woodworkers, with other wood product manufacturing employing 23 percent; wood kitchen cabinets and countertop manufacturing employing 21 percent. (theartcareerproject.com)
- Woodworkers on the lower end of that spectrum, the bottom 10% to be exact, make roughly $24,000 a year, while the top 10% makes $108,000. (zippia.com)
- Most woodworkers agree that lumber moisture needs to be under 10% for building furniture. (woodandshop.com)
External Links
How To
How to join wooden boards without using nails
Woodworking is a favorite hobby. It's fun and relaxing because you can use your hands to make something useful from wood. There are times when two pieces of wood need to be joined together. This article will teach you how to do this to keep your woodwork projects looking great.
First, remove any sharp edges from the wood pieces before you join them. You don't want any sharp corners to cause problems later. Once you have done that, you can begin gluing your boards together.
When working with hardwood, glue should be applied only to one side. For softwoods like cedar and pine, glue should be applied to both sides. Once you have applied the glue, press down on the boards until they are fully attached. Make sure you let the glue dry before moving on to the next step.
Once you've glued your boards together you will need to drill holes in the joints to accommodate screws. You can choose the type of screw to determine the size of your holes. For example, if your screw is a 1/2-inch wooden screw, drill a hole that is at minimum 3/4 inches deep.
Once you have drilled your holes you will need to drive the screws through each joint and into the backside. Do not hit the boards' front surfaces. It will ruin the finish. Be careful not to drive the screws too hard at the ends. This will prevent the wood from splitting.
After your project is completed, you will need to protect it from the weather. To do this, you can seal the entire furniture piece or just cover the top. It doesn't matter what method you use, you want something that will last many years. Oil-based varnishes are, among others, polyurethanes shellac, laquer, and other oil-based products.
These products can usually be found at any home improvement store. Be sure to choose the right one for your project. Remember that some finishes can be toxic, so you should not use them indoors. Always wear protective gear when handling any of these finishes.